|
Horizontal Toolbar, Push Button, Trigger
Introduction
A canvas is a
place to hold the objects. The four types
of canvases are: Content, Stacked, Tab,
and Toolbar. All can coexist within a single
window. A content canvas is the basic
background for all windows. A stacked
canvas lays on top of the others. A
tab canvas is the same as stacked
canvases with handy �tabs� at the top. It
can simply move from one canvas to another.
A toolbar canvas contains push
buttons giving users quick access such as
horizontal canvas or vertical canvas.
Horizontal
Toolbar
A
Horizontal Toolbar canvas contains
buttons that give you quick access to your
application functions. They would be
activated by your defined triggers.
Hands-On
New functional
requirements came in from the users. They
need a horizontal toolbar to have on their
Form. The toolbar should contain all the
frequently used options. This will make ease
of use of some options.
The following
are the list of all the frequently used
functions they expect to use:
Move to
previous record,
Move to next
record,
Add new
record,
Delete current
record,
Save work, and
Exit the
application.
See Figure 9.
Your tasks
are:
1- Adding more
functionality to the application.
2- Create a
horizontal Toolbar.
3- Create push
button for above frequently used functions
list.
4- Create and
compile triggers for each push button
created on step 3.
5- Run and
test all user functional requirements.
You will learn
how to: create and use horizontal toolbar,
create and use the push button item, create
the "WHEN-BUTTON-PRESSED" trigger, write and
compile trigger, use tab canvas, use �object
navigator,� use �Data Blocks,� use �Layout
Editor,� use �Property Palette,� use �Run
Form,� and �Execute Query.�
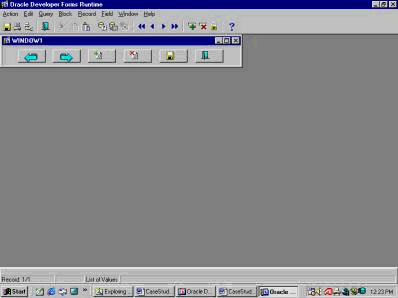
Figure 9
Open a Module
In the �Object
Navigator� window, highlight Forms. Go to
the Main menu and choose �File,� select
�Open� to open an existing form (customer_orders_V06)
in the folder.
Save a Module
Click on the
�CUSTOMER_ORDERS_V06� form. The color will
change to blue. Now, change the name and
then save the Form name as version 07 (customer_orders_v07).
This way the original form is untouched.
Create a
Canvas
To create more
canvas, go to the Object Navigator window
and highlight the Canvases item. Click on
the green �+� sign in the toolbar in the
Object Navigator. A canvas will be created
for you (CANVASnn). The nn could be any
Oracle assigned number.
Change a
property palette sheets
Right click on
it and open its Property Palette. Change
�name� to "PB_BLOCK.� The PB stand for Push
Button Block. Change "Canvas type" to
"Horizontal toolbar." Check the icon next to
it changed in the Object Navigator. Close
the window.
Select a
Canvas
In the Layout
Editor click on the Down Arrow next to the
Canvas box to select new canvas (PB_BLOCK).
Notice that,
it is too big to be the "horizontal toolbar"
canvas. Change the size. Notice that you
will see two boarders one is white and the
other block. Let see if you only drag the
black boarder. Check the picture to see how
your horizontal tool bar is going to be.
Navigate
through these two canvases.
Create a New
Data block
In the Layout
Editor, highlight the �Data Blocks� and
click on the green �+� sign to create a new
data block.
New Control
Data Block
In the �New
Data Block� window, don�t choose the default
option. Select the �Build a new data block
manually� and click "OK."
Change a
property palette sheets
Right click on
it and open its Property Palette. In the
Property Palette window, change the Name
value to �PB_BLOCK.� Change "Database Data
Block" to �NO.� Then close the window.
Create a Push
Button Item
In the Layout
Editor, while the Canvas value is PB_BLOCK
and the Block value is PB_BLOCK, click on
the PUSH BUTTON icon on the toolbar and drag
the �+� sign on the PB_BLOCK canvas and
click where you wish to have your Push
Button.
Copy and paste
objects
Copy the
object and paste it five times. The copy
will be pasted on the top of each other. You
need to select them one by one and drag them
to be next to each others. Now, you should
have six push buttons.
Change a
property palette sheets
Right click on
the first push button object and open its
property palette. Change "name" to �PREV_REC.�
Blank the "label." Set �iconic� to "yes." On
�Icon Filename,� type "w_prev." This is an
oracle reserve word and could be different
version to version. Change "Keyboard
Navigators" and "Mouse Navigators� to �NO.�
Then close the window.
Repeat the
process for the rest of the push button
items.
Only change
the name and the Icon Filename.
Change name to
NEXT_REC.
On �Icon
Filename,� use "w_next" for next record.
Change name to
ADD_REC.
On �Icon
Filename,� use "addrow" for adding a record.
Change name to
DEL_REC.
On �Icon
Filename,� use "delrow" for deleting a
record.
Change name to
SAVE.
On �Icon
Filename,� use "save" for saving the
application transactions.
Change name to
EXIT.
On �Icon
Filename,� use "exit" for exiting the
application.
While holding
the control key, click on the objects you
want to select. And then right click to open
their property palette.
Change
�height� to 20 and press the enter key.
Close the
window.
Make some
layout adjustments if needed.
Notice that
these push buttons have no functionality.
Expand the
PB_BLOCK data block. Expand the ITEMS
object. All the items in the PB_BLOCK data
block will be displayed. Notice that the box
next to Trigger is empty for all the items
in the data block. That means they don�t
have any triggers.
Create a
trigger
For each item,
highlight the Trigger item and click on the
green �+� sign on the toolbar in the Object
Navigator window to create a trigger.
WHEN-BUTTON-PRESSED trigger
In the Trigger
window, type a letter �W� and you will see
all the triggers that start with the letter
�W.� Select the �WHEN-BUTTON-PRESSED�
trigger.
In the PL/SQL
Editor window, write a query for a record to
navigate to a previous record.
Using PL/SQL
Editor
(PL/SQL
Editor)
PREVIOUS_RECORD;
Compile a
PL/SQL block
Compile it.
Repeat this
process for all the other triggers.
For NEXT_REC:
(PL/SQL
Editor)
NEXT_RECORD;
For ADD_REC:
(PL/SQL
Editor)
CREATE_RECORD;
For DEL_REC:
(PL/SQL
Editor)
DELETE_RECORD;
For SAVE:
(PL/SQL
Editor)
PREVIOUS_RECORD;
For EXIT:
(PL/SQL
Editor)
COMMIT_WORK;
Notice on
different ways of doing this.
Check the
application layout.
Run the Forms
Runtime
Then run the
application.
Here, the only
canvas you can see is: the horizontal
toolbar canvas. There is no indication of
the other canvas. You should drag the window
to see the other canvas.
You can either
close the window or drag to resize the
window to use the �Customer�s Order�
application. Resize the window and execute
the query.
Test the push
button functionality. After the testing is
done, close the window and save the changes.
The canvas
should not be small and user will not like
to drag the window to see other data
information. In the next hands-on exercise,
we will learn how to avoid such problem and
why we were getting that.
Questions:
Q: Describe a
canvas in the Form Module.
Q: The four
types of canvases are: ________
Q: Describe
all four types of canvases.
Q: How do you
create a horizontal toolbar?
Q: How do you
create a push button item?
Q: New
functional requirements came in from the
users. They need a horizontal toolbar to
have on their Form. The toolbar should
contain all the frequently used options.
This will make ease of use of some options.
The following
are the list of all the frequently used
functions they expect to use:
Move to
previous record,
Move to next
record,
Add new
record,
Delete current
record,
Save work, and
Exit the
application.
See Figure 9.
Your tasks
are:
1- Adding more
functionality to the application.
2- Create a
horizontal Toolbar.
3- Create push
button for above frequently used functions
list.
4- Create and
compile triggers for each push button
created on step 3.
5- Run and
test all user functional requirements.
|